Use lambda resolvers in your GraphQL API with AWS Amplify
Written by Nick Van Hoof. Big thanks to Matthew Marks for the review.
TL;DR - Find out how to update your API resources with a lambda resolver.
The use case
You have a posts with comments.
When you remove a post, you want to remove the comments too.
How do you do that with one graphql mutation?
Use a LAMBDA RESOLVER!
To put it more difficult : I want to show you how you can make an update to multiple of your Amplify API
@model-annotated types (and corresponding DynamoDB tables) in one graphql request.

The API
Aight, let's see our API definition. (I took this straight from the Amplify docs and made my additions with the custom query)
| type Blog @model { | |
| id: ID! | |
| name: String! | |
| posts: [Post] @connection(keyName: "byBlog", fields: ["id"]) | |
| } | |
| type Post @model @key(name: "byBlog", fields: ["blogID"]) { | |
| id: ID! | |
| title: String! | |
| blogID: ID! | |
| blog: Blog @connection(fields: ["blogID"]) | |
| comments: [Comment] @connection(keyName: "byPost", fields: ["id"]) | |
| } | |
| type Comment @model @key(name: "byPost", fields: ["postID", "content"]) { | |
| id: ID! | |
| postID: ID! | |
| post: Post @connection(fields: ["postID"]) | |
| content: String! | |
| } | |
| type Mutation { | |
| deletePostAndComments(postId: ID!): DeletePostAndCommentsResponse | |
| @function(name: "editPostAndComments-${env}") | |
| } | |
| type DeletePostAndCommentsResponse { | |
| id: ID! | |
| } |
Hooray!
- A custom mutation to delete a post and corresponding comments.
- The response of this mutation containing the id of the deleted post.
- The
@functiondirective which create a pipeline resolver to resolve our custom mutation.
If you want to follow along, run amplify add api and use the schema above.
But hold your horses, do not deploy.
This won't work yet.
We first have to create the function.
The Lambda Function
Since we used the @function directive Amplify will make sure that AppSync resolves the deletePostAndComments mutation using the Lambda Function.
Let's create that function, shall we?!
In the function we follow these steps:
- Import the name of our model tables. Via environment variables. We'll see later how to add these.
- Specify a resolver for the mutation type and
deletePostAndCommentsfield. - In our handler, select the right resolver.
- Execute the resolver logic and return the id of the deleted post
Here it is.
More explanation below!
| const AWS = require("aws-sdk"); | |
| const docClient = new AWS.DynamoDB.DocumentClient(); | |
| const POSTTABLE = process.env.POSTTABLE; | |
| const COMMENTTABLE = process.env.COMMENTTABLE; | |
| const resolvers = { | |
| Mutation: { | |
| deletePostAndComments: (event) => { | |
| return deletePostAndComments(event); | |
| }, | |
| }, | |
| }; | |
| exports.handler = async function (event, context) { | |
| console.log(event); | |
| console.log(context); | |
| const typeHandler = resolvers[event.typeName]; | |
| if (typeHandler) { | |
| const resolver = typeHandler[event.fieldName]; | |
| if (resolver) { | |
| return await resolver(event); | |
| } | |
| } | |
| throw new Error("Resolver not found."); | |
| }; | |
| async function deletePostAndComments(event) { | |
| const removeCommentsProm = removeCommentsOfPost(event.arguments.postId); | |
| const removePostProm = removePost(event.arguments.postId); | |
| const [_, deletedPost] = await Promise.all([ | |
| removeCommentsProm, | |
| removePostProm, | |
| ]); | |
| return { id: deletedPost.id }; | |
| } | |
| async function removePost(postId) { | |
| const deletedPost = await deletePost(postId); | |
| console.log("Deleted post is: ", deletedPost); | |
| console.log("Deleted post with id: ", deletedPost.id); | |
| return deletedPost; | |
| } | |
| async function removeCommentsOfPost(postId) { | |
| const comments = await listCommentsForPost(postId); | |
| await deleteComments(comments); | |
| } | |
| async function listCommentsForPost(postId) { | |
| var params = { | |
| TableName: COMMENTTABLE, | |
| IndexName: "byPost", | |
| KeyConditionExpression: "postID = :postId", | |
| ExpressionAttributeValues: { ":postId": postId }, | |
| }; | |
| try { | |
| const data = await docClient.query(params).promise(); | |
| return data.Items; | |
| } catch (err) { | |
| return err; | |
| } | |
| } | |
| async function deleteComments(comments) { | |
| // format data for docClient | |
| const seedData = comments.map((item) => { | |
| return { DeleteRequest: { Key: { id: item.id } } }; | |
| }); | |
| /* We can only batch-write 25 items at a time, | |
| so we'll store both the quotient, as well as what's left. | |
| */ | |
| let quotient = Math.floor(seedData.length / 25); | |
| const remainder = seedData.length % 25; | |
| /* Delete in increments of 25 */ | |
| let batchMultiplier = 1; | |
| while (quotient > 0) { | |
| for (let i = 0; i < seedData.length - 1; i += 25) { | |
| await docClient | |
| .batchWrite( | |
| { | |
| RequestItems: { | |
| [COMMENTTABLE]: seedData.slice(i, 25 * batchMultiplier), | |
| }, | |
| }, | |
| (err, data) => { | |
| if (err) { | |
| console.log(err); | |
| console.log("something went wrong..."); | |
| } | |
| } | |
| ) | |
| .promise(); | |
| ++batchMultiplier; | |
| --quotient; | |
| } | |
| } | |
| /* Upload the remaining items (less than 25) */ | |
| if (remainder > 0) { | |
| await docClient | |
| .batchWrite( | |
| { | |
| RequestItems: { | |
| [COMMENTTABLE]: seedData.slice(seedData.length - remainder), | |
| }, | |
| }, | |
| (err, data) => { | |
| if (err) { | |
| console.log(err); | |
| console.log("something went wrong..."); | |
| } | |
| } | |
| ) | |
| .promise(); | |
| } | |
| } | |
| async function deletePost(id) { | |
| var params = { | |
| TableName: POSTTABLE, | |
| Key: { id }, | |
| ReturnValues: "ALL_OLD", | |
| }; | |
| try { | |
| const data = await docClient.delete(params).promise(); | |
| const response = data.Attributes; | |
| return response; | |
| } catch (err) { | |
| return err; | |
| } | |
| } |
A brief word on the resolver logic that is executed.
- Find all comments linked to this post by querying the GSI
byPostthat is created in the API specification inschema.graphql. - Execute the requests to remove all corresponding comments and the post. Notice that we execute these request in parallel by resolving the promises together.
- The comments are deleted via the
batchWriteAPI of DynamoDB. A post might have tens or hundreds of comments. You don't want to execute hundreds of separate requests (because of latency). Kudos to Nader Dabit for providing the Document Client Cheat sheet (find the link in the resources)
Now add the function using the Amplify cli.
amplify add function
? Select which capability you want to add: Lambda function (server
less function)
? Provide an AWS Lambda function name: editPostAndComments
? Choose the runtime that you want to use: NodeJS
? Choose the function template that you want to use: Hello World
? Do you want to configure advanced settings? No
? Do you want to edit the local lambda function now? Yes
And add the code above in index.js.
Add this point you can run amplify push for the first time.
However, did you notice that we chose the Hello World template.
This won't configure the necessary access rights to the DynamoDB resources.
Neither of the templates will, we'll do this ourselves in the section below.
Also, we need environment variables for our Lambda function!
Read on to find out how to setup custom permissions and environment variables.
Configuring our Lambda Function
Now we dive deep into working with Amplify!
Adding the function to our project created a bunch of files to configure the function.

Nothing to be scared of, yet it can frighten new users:
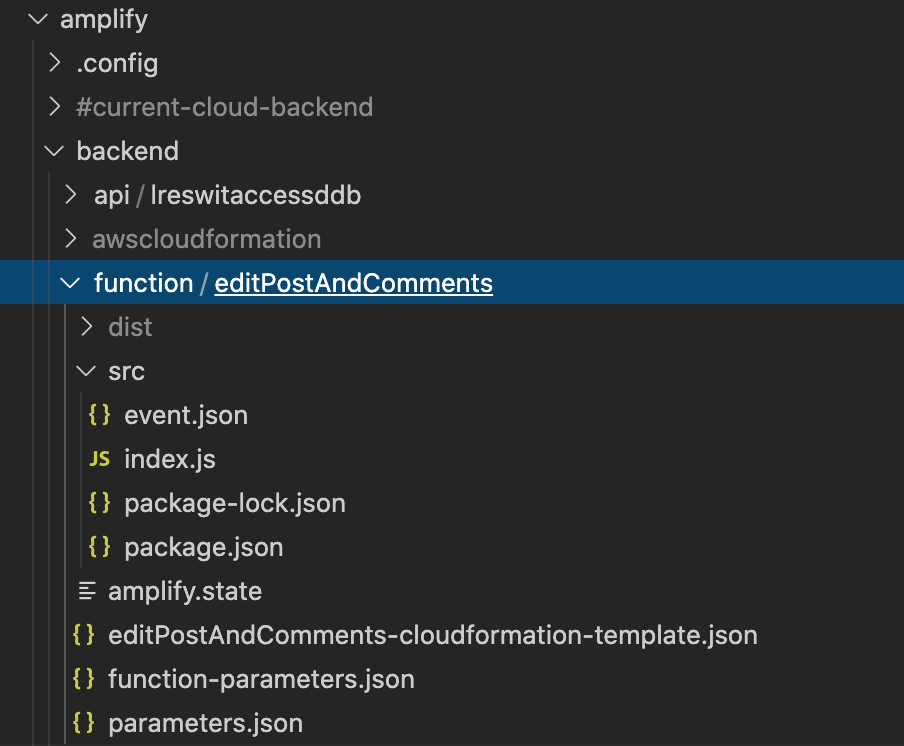
editPostAndComments-cloudformation-template.json: contains the cloudformation that defines all the resources related to this function eg. role, permission, triggers, the function itself..parameters.json: a file that we will create below. Contains the parameters that will be past into this template coming from other cloudformation stacks.
You guessed it, we have to add our environment variables and permissions to this cloudformation template.
In the parameters inside editPostAndComments-cloudformation-template.json add:
"apiGraphQLAPIIdOutput": {
  "Type": "String"
},
This will be the parameter that receives the Id of your AppSync GraphQL API.
Under environment variables inside editPostAndComments-cloudformation-template.json add:
"POSTTABLE": {
  "Fn::ImportValue": {
    "Fn::Sub": "${apiGraphQLAPIIdOutput}:GetAtt:PostTable:Name"
  }
},
"COMMENTTABLE": {
  "Fn::ImportValue": {
    "Fn::Sub": "${apiGraphQLAPIIdOutput}:GetAtt:CommentTable:Name"
  }
},
"AWS_NODEJS_CONNECTION_REUSE_ENABLED": 1
Here we import the table names which are exported by our API stacks.
Also notice the CONNECTION_REUSE environment variable; This will make sure connections with DynamoDB are reused in our function instead of opening and closing all the time.
Hence, performance gain!
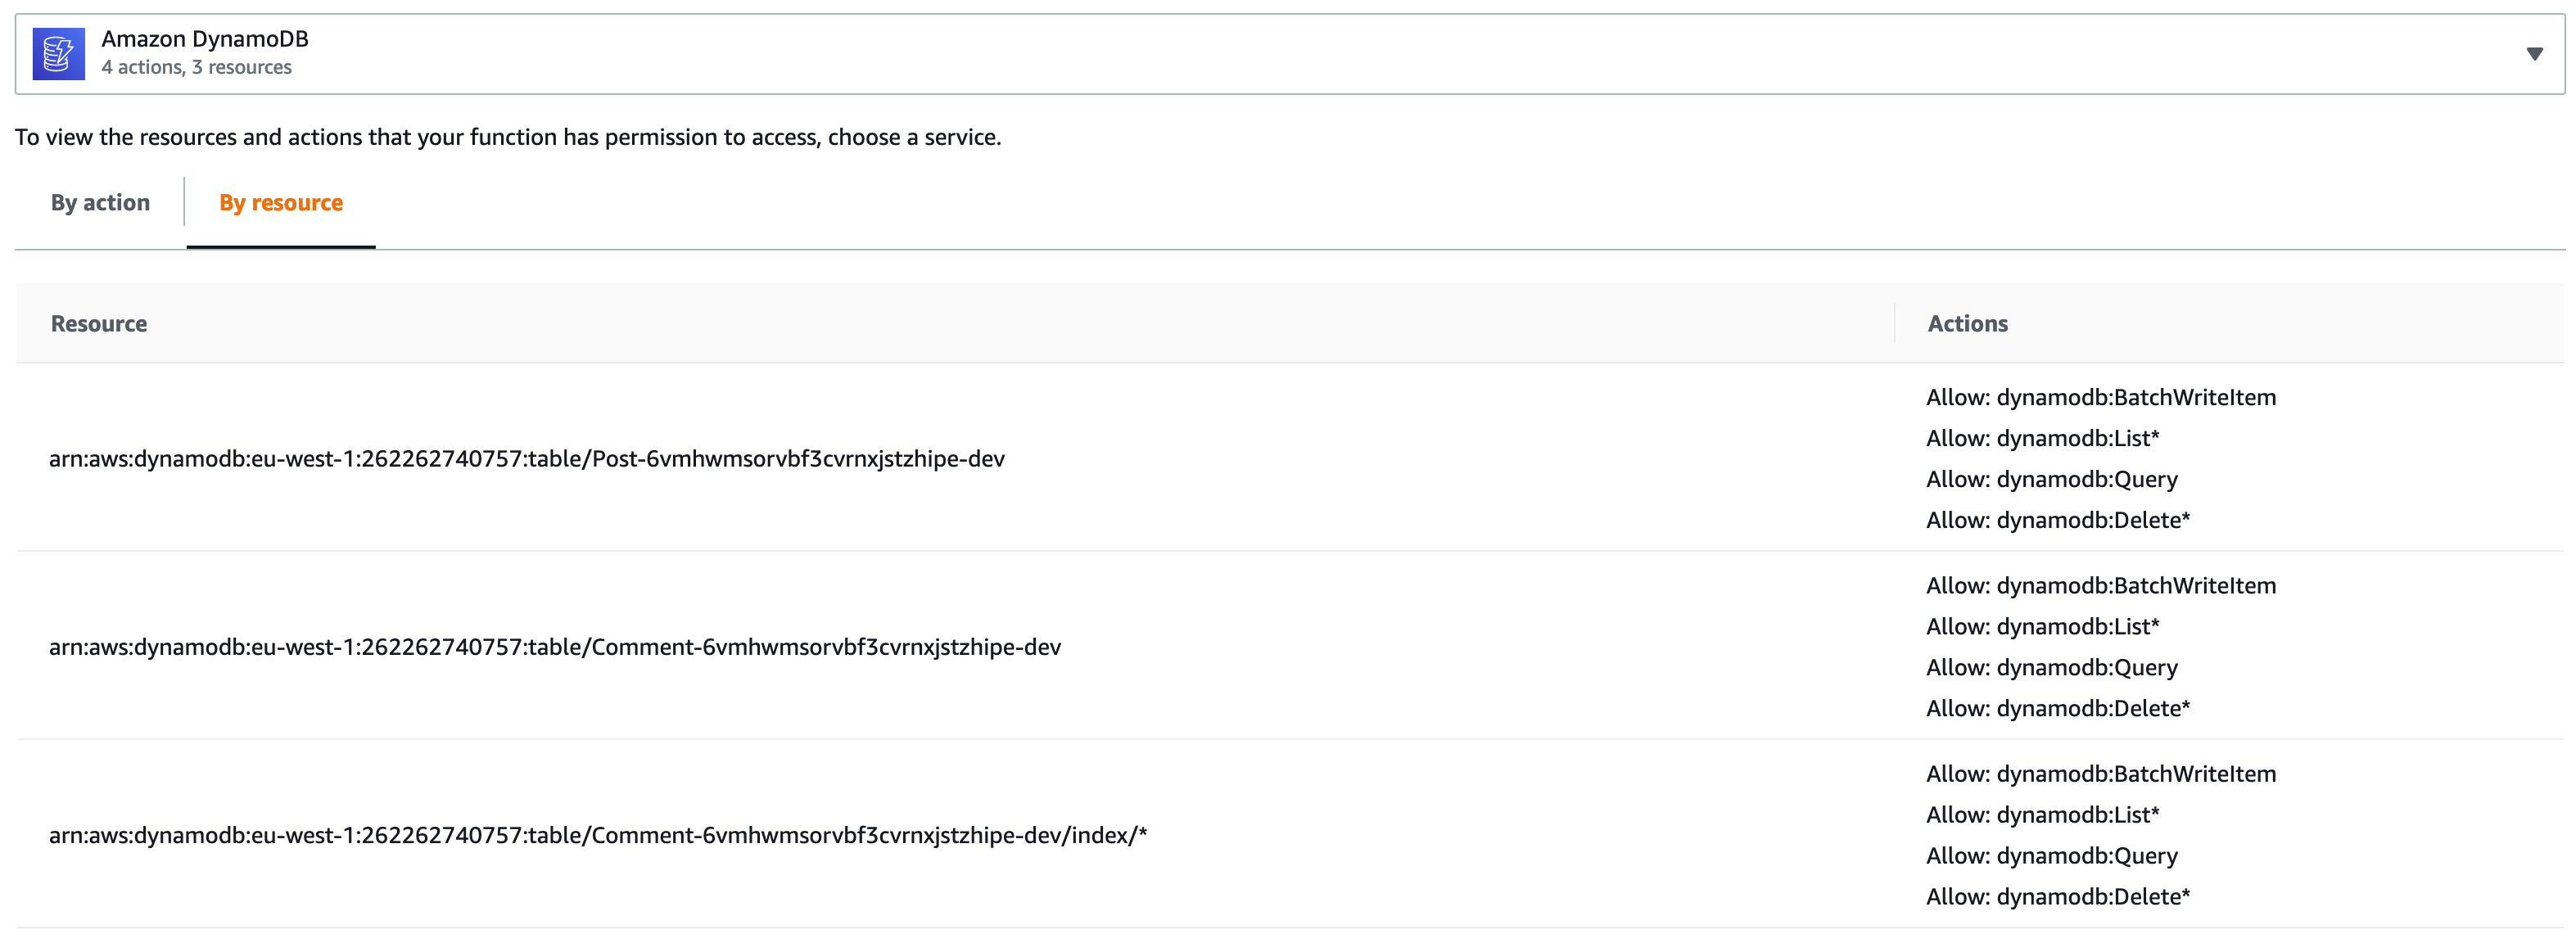
Now let's add the policies with the permissions for accessing our dynamodb API resources:
Under resources inside editPostAndComments-cloudformation-template.json add:
| "AccessDynamoDBApiResourcesPolicy": { | |
| "DependsOn": ["LambdaExecutionRole"], | |
| "Type": "AWS::IAM::Policy", | |
| "Properties": { | |
| "PolicyName": "amplify-lambda-execution-policy", | |
| "Roles": [ | |
| { | |
| "Ref": "LambdaExecutionRole" | |
| } | |
| ], | |
| "PolicyDocument": { | |
| "Version": "2012-10-17", | |
| "Statement": [ | |
| { | |
| "Effect": "Allow", | |
| "Action": [ | |
| "dynamodb:BatchWriteItem", | |
| "dynamodb:List*", | |
| "dynamodb:Query", | |
| "dynamodb:Delete*" | |
| ], | |
| "Resource": [ | |
| { | |
| "Fn::Sub": [ | |
| "arn:aws:dynamodb:${AWS::Region}:${AWS::AccountId}:table/${tablename}", | |
| { | |
| "tablename": { | |
| "Fn::ImportValue": { | |
| "Fn::Sub": "${apiGraphQLAPIIdOutput}:GetAtt:PostTable:Name" | |
| } | |
| } | |
| } | |
| ] | |
| }, | |
| { | |
| "Fn::Sub": [ | |
| "arn:aws:dynamodb:${AWS::Region}:${AWS::AccountId}:table/${tablename}", | |
| { | |
| "tablename": { | |
| "Fn::ImportValue": { | |
| "Fn::Sub": "${apiGraphQLAPIIdOutput}:GetAtt:CommentTable:Name" | |
| } | |
| } | |
| } | |
| ] | |
| }, | |
| { | |
| "Fn::Sub": [ | |
| "arn:aws:dynamodb:${AWS::Region}:${AWS::AccountId}:table/${tablename}/index/*", | |
| { | |
| "tablename": { | |
| "Fn::ImportValue": { | |
| "Fn::Sub": "${apiGraphQLAPIIdOutput}:GetAtt:CommentTable:Name" | |
| } | |
| } | |
| } | |
| ] | |
| } | |
| ] | |
| } | |
| ] | |
| } | |
| } | |
| } |
index.js.
Mind that we need access to the tables, but also to the index byPost on the comments table.
People often think that custom configuration in editPostAndComments-cloudformation-template.json will be overwritten with every push.
This is NOT TRUE.
- Custom configuration is not overwritten on running
amplify push. - Name your custom resources, here
AccessDynamoDBApiResourcesPolicy, with a name that is not used as a standard by the framework (eg.lambdaexecutionpolicy; don't uselambdaexecutionpolicyfor your custom policy). Now your policy will survive even when runningamplify fuction updatefor our function.
As long as you follow these guidelines, you are pretty safe.
Next add a file parameters.json next to editPostAndComments-cloudformation-template.json
{
  "apiGraphQLAPIIdOutput": {
    "Fn::GetAtt": ["api<nameOfYourAppSyncAPI>", "Outputs.GraphQLAPIIdOutput"]
  }
}
Here we are telling Amplify to get the outputted GraphQLAPIIdOutput from the api<nameOfYourAppSyncAPI> stack.
We are basically connecting our stacks here by referencing a variable from another stack which will be passed into our template.
And we have lift off!
Run amplify push.
Testing our setup
Log into the AWS console, go to your lambda function and verify that it has the correct permissions and environment variables.

Go to the AppSync console! Create a post:
mutation CreatePost {
  createPost(input: {blogID: "dfeebd0d-3d18-4e3e-9d10-88fcf0fb8b4d", title: "Hello Cloud"}) {
    id
  }
}
Specify the returned id as query variable:
{
  "postId": "50571e27-e0f3-48ce-9432-c7eb0307010d"
}
Create some comments for the post:
mutation CreateCommentsForPost($postId: ID!) {
  create1: createComment(input: {postID: $postId, content: "This is a short comment"}) {
    id
  }
  create2: createComment(input: {postID: $postId, content: "This is a second comment"}) {
    id
  }
	create3: createComment(input: {postID: $postId, content: "This is the last comment"}) {
    id
  }
}
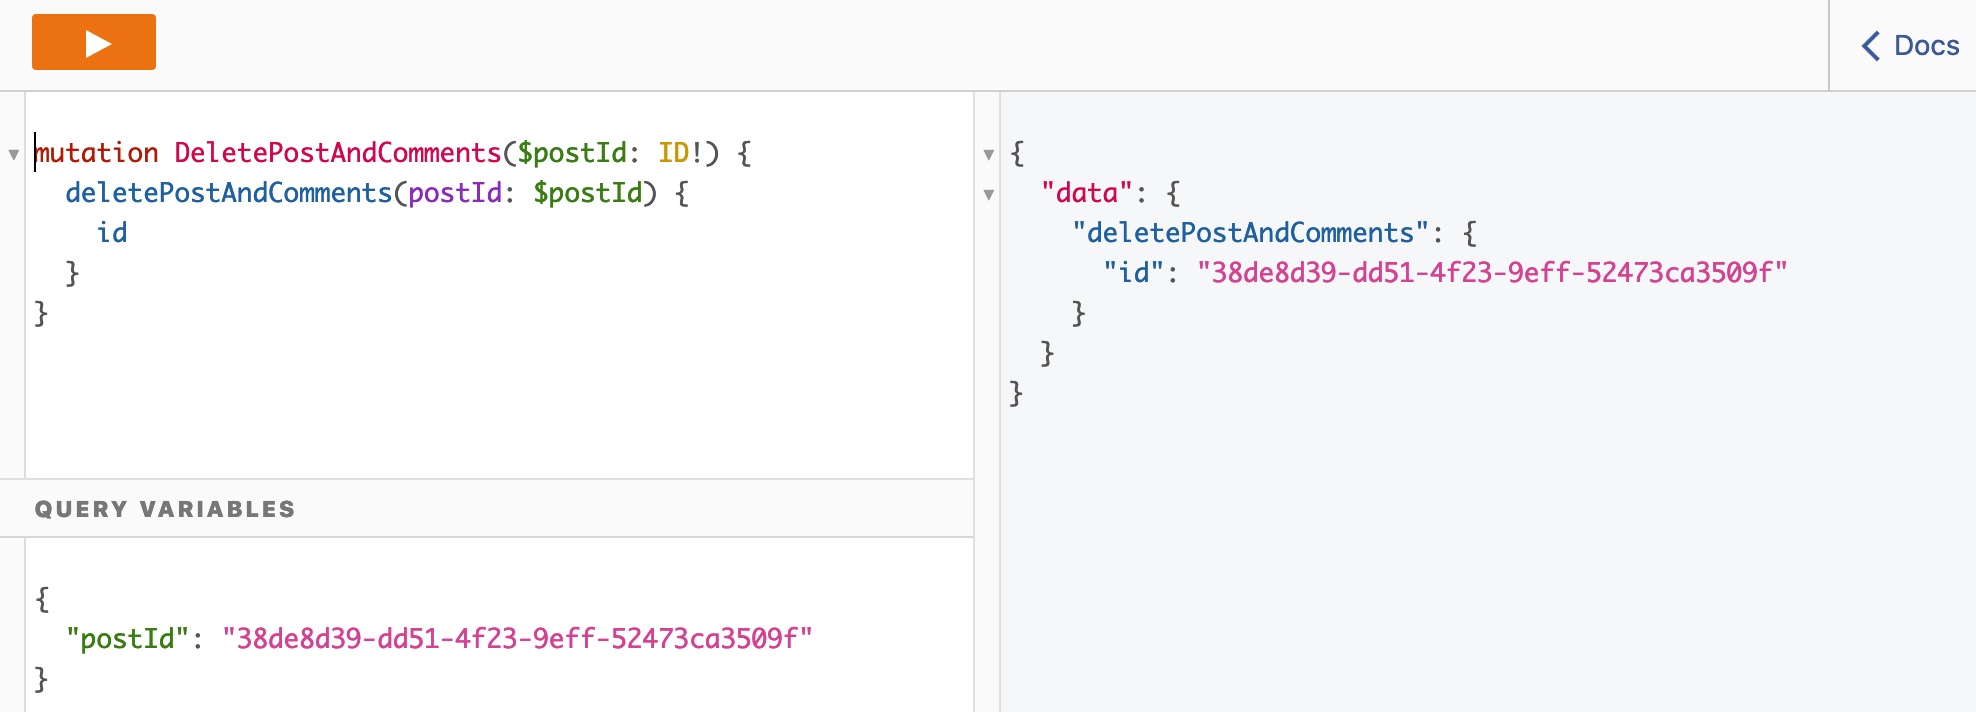
And now for the big moment. Delete the post and its comments at once!
mutation DeletePostAndComments($postId: ID!) {
  deletePostAndComments(postId: $postId) {
    id
  }
}
Nice, that should look like:

If you made that work, you are a .
If you did not make it work, but you made it till here in the blogpost you are also a .
If you need guidance, reach out to me: Nick on Twitter
Testing performance
Let's say you have a post which has 500 comments!
When deleting the post and the comments via a synchronous api call, how much time would that take.
Well, let's test it out!
I created a post and added a 500 comments.
If you look into the logic of the Lambda function you'll find that the comments are deleted using the batchWrite API of DynamoDB.
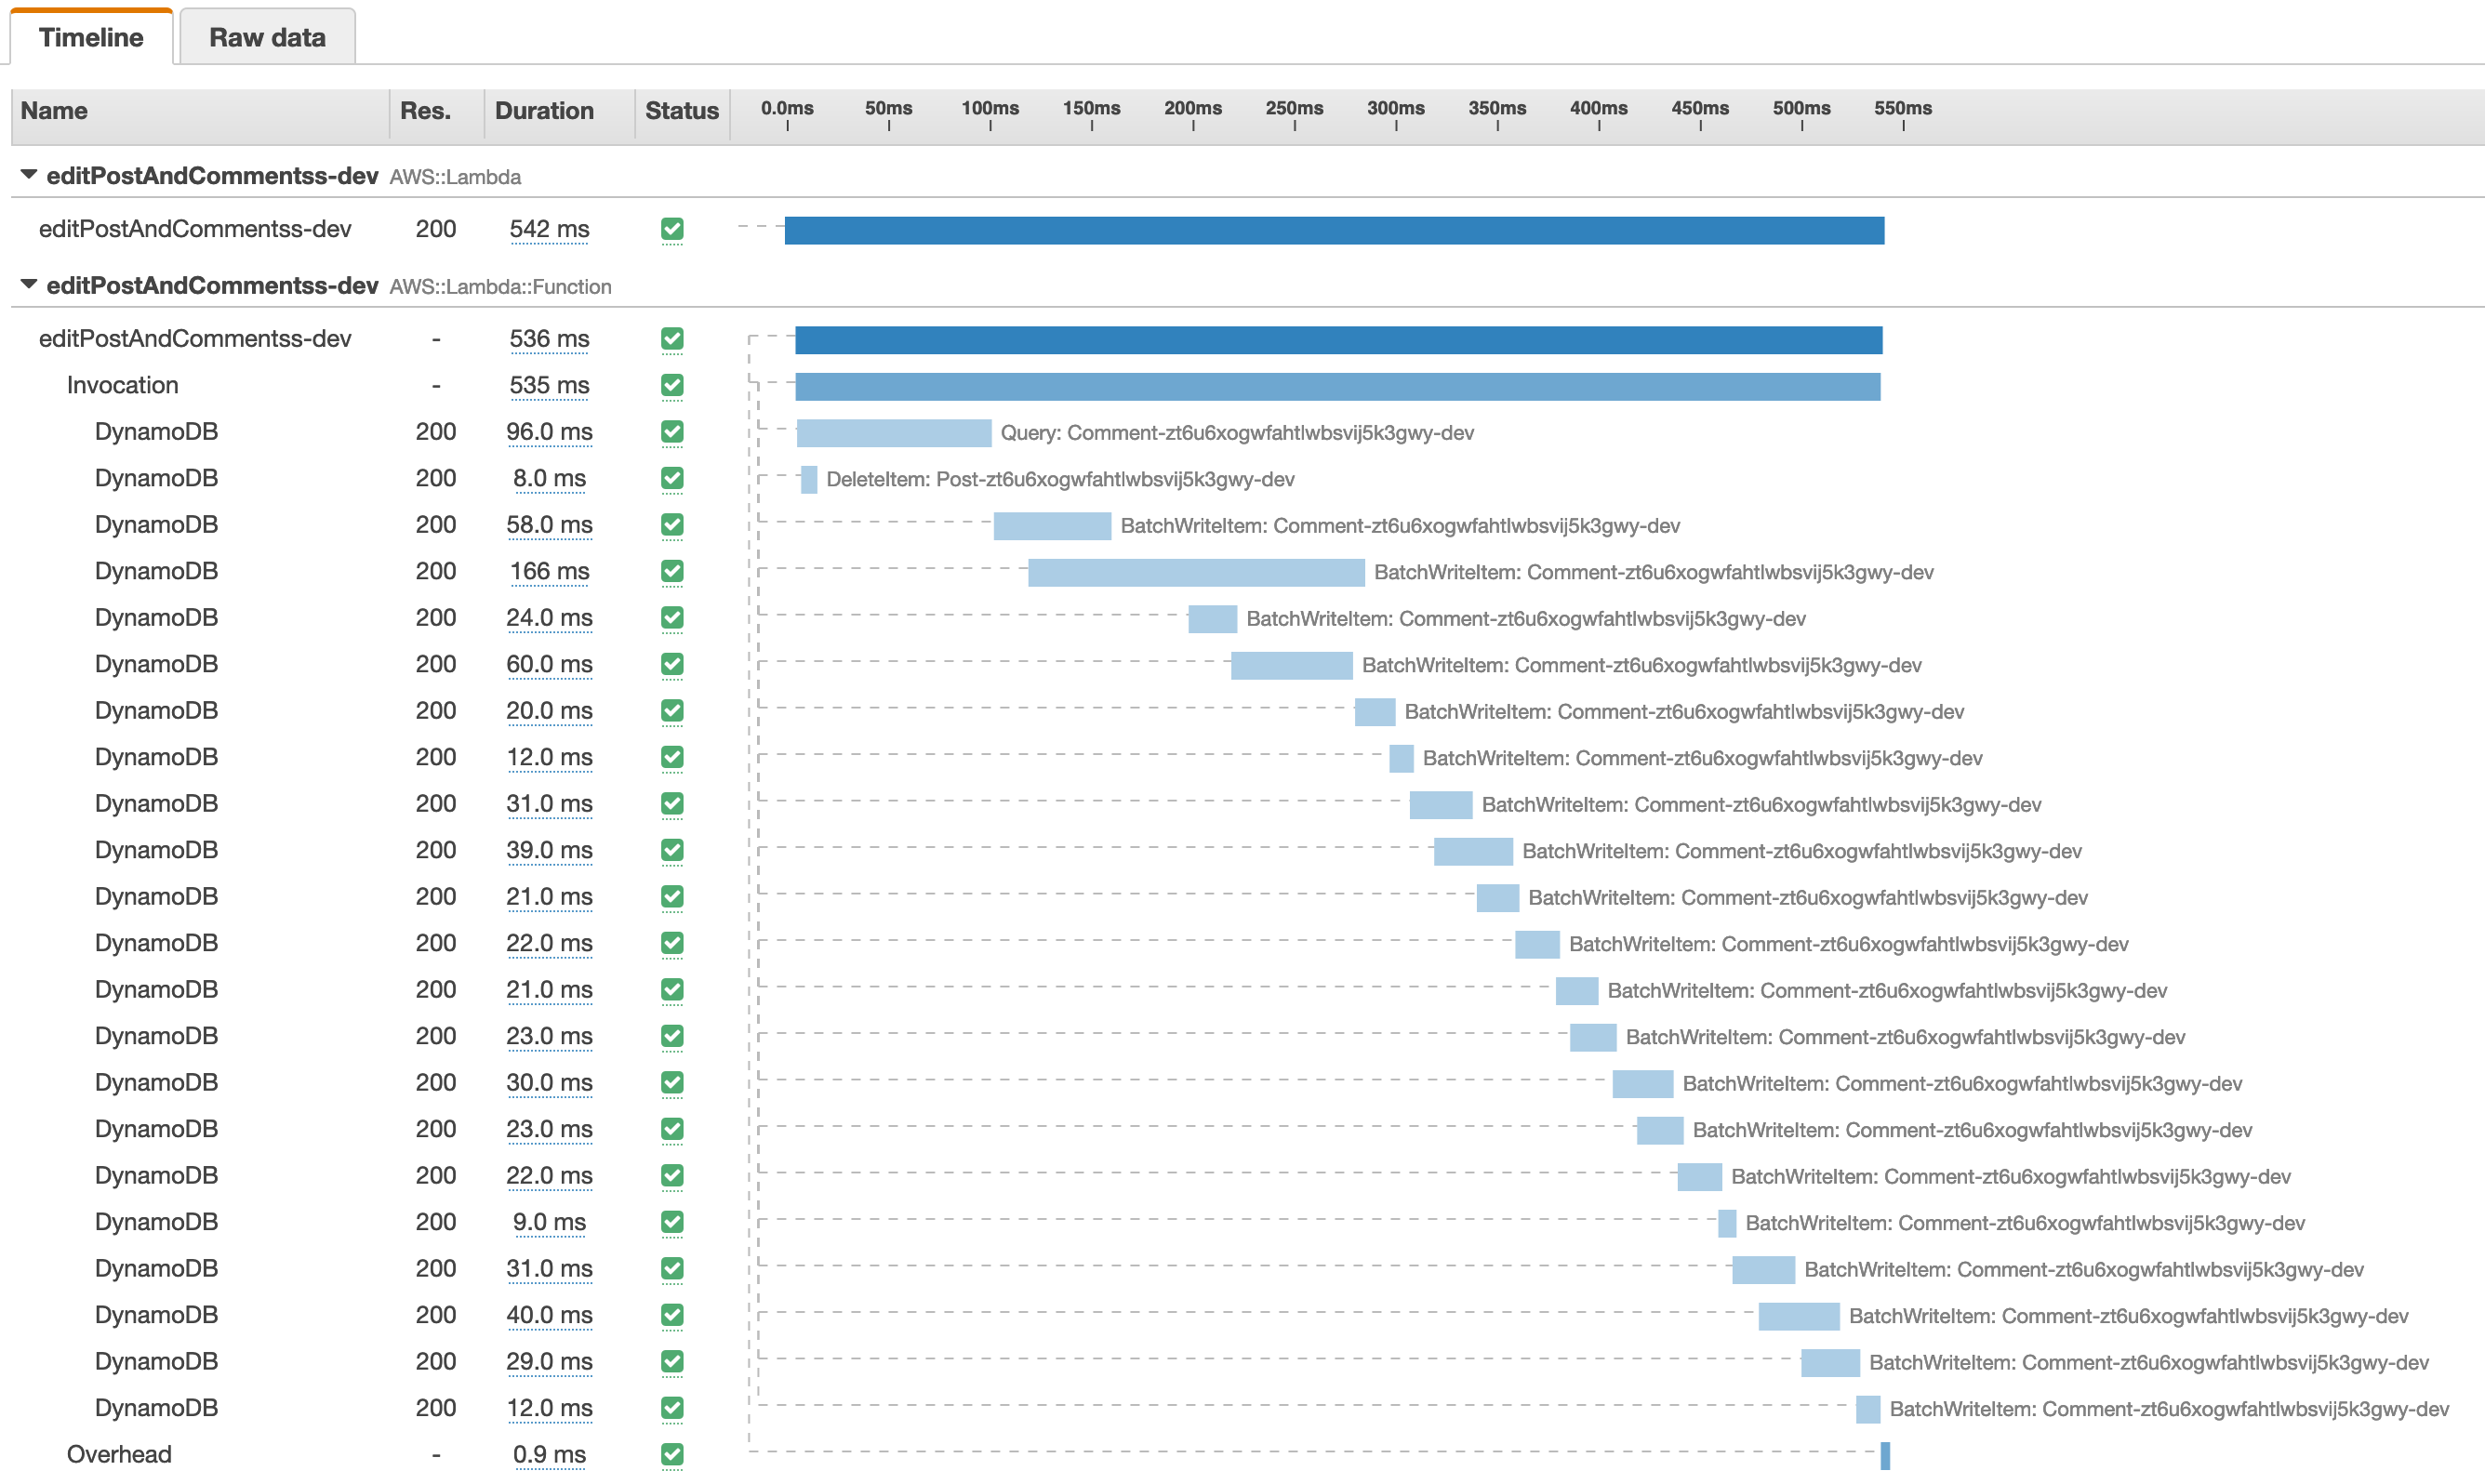
Even the batchWrite API request can only contain 25 requests at once, meaning we need 20 batchWrite calls to delete 500 comment.
That is still quite a lot!
Let's see how it performs via AWS Xray:

It took about 600 ms to resolve the deletePostAndComments mutation for 1 post with 500 comments using a Lambda Function with 512 Mb of memory configured.
If executing your Graphql mutation always has to update (or delete) this many (or more) items, there is a point at which it becomes a better solution to execute that work asynchronously.
You could delete a post using a normal VTL resolver generated by Amplify.
Then you can catch the delete event of the DynamoDB change stream to delete the comments with a Lambda function.
Something for the next blog.
Resources
- Working example for the demo in this blog: https://github.com/Nxtra/Amplify-API-Lambda-Resolver
- Amplify direct lambda resolvers by Matt Marks: https://dev.to/aws-builders/direct-lambda-resolvers-with-aws-amplify-and-appsync-2k3j
- Document client cheat sheet by Nader Dabit: https://github.com/dabit3/dynamodb-documentclient-cheat-sheet
Credits
- A big thanks to Matthew Marks for reviewing this blogpost.
He does great work for the Amplify community, check it out here. - Featured image by Kolleen Gladden on Unsplash.